Evident LogoOlympus Logo
자료실
Application Notes
자료로 돌아가기

갭리스 방법을 사용한 전체 범위의 경사 결함 보정


Introduction

The seamless tube manufacturing process can generate flaws in various angles around the longitudinal axis of a tube. These flaws, introduced primarily during the lamination or heat treatment process, can cause the tube to fail while in use, potentially leading to catastrophic economic and social impacts.

Challenges

To ensure the integrity of their products, seamless tube manufacturers must maintain stringent quality standards. For this reason, they need to use the most reliable and precise inspection methods available. However, many conventional automated phased array ultrasonic testing (PAUT) tube inspection systems assume that the manufacturing process generates flaws at certain discrete angles, which is not always the case.

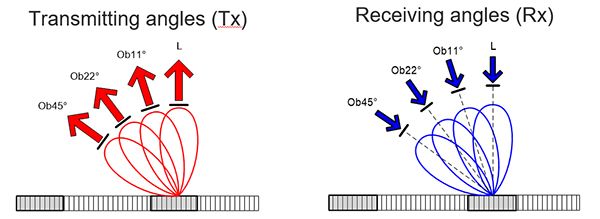
Commonly used firing and receiving angles for oblique inspection

With the current PAUT method, to ensure inspection coverage for a range of oblique angles, the reference standard used for calibration would need to contain several notches at different angles, and each of them would need to be calibrated individually.

Solution

The gapless inspection solution provided by the Olympus Rotating Tube Inspection System (RTIS) manages to overcome the hurdle of calibrating for flaw detection without a reference notch for each oblique orientation. The gapless method uses only one transmitting angle for a range of oblique reference notches but covers the target area completely with a higher number of receiving channels.

Gapless firing and receiving for continuous oblique inspection

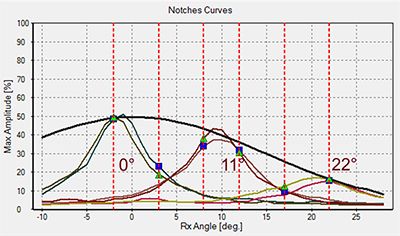
Using the same pipe map used today to calibrate discrete oblique orientation, the gapless method takes a highresolution scan of each artificial flaw and creates a powerful scan for every angle, enabling extrapolation of the missing notches. From each curve, shape parameters are extracted and compared to create the normalization curve in the figure below. This curve gives us the virtual notch response for each angle of the range.

High-resolution scan for standard calibration notch (before normalization)

Calibration targets for each receiving channel are automatically updated when setup parameters change, so the calibration sequence and the results displayed remain unchanged compared to existing discrete oblique inspection using phased array.

Results

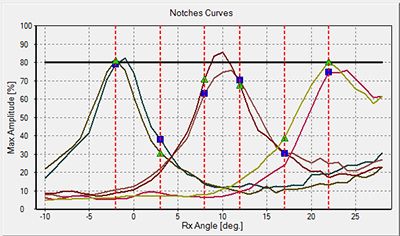
In the figure to the right, the normalization curve (solid black line) is set at a constant calibration level, setting the offset gain required for each receiving channels. Calibration targets are also displayed, using the maximum point where a notch curve (solid line) crosses the Rx channel position (red dotted line).

High-resolution scan for standard calibration notch (before normalization)

Calibration of each receiving channel is performed using the existing notches and can be displayed in 2D using the RTIS Top Turn device. This 2D visualization reduces calibration time as it enables the manufactured defects to be located at the same axial position.

Using this method, calibration results can be predicted and then validated with simple tests; for example, when scanning an intermediate notch (not used for calibration), the normalization curve level can be confirmed.

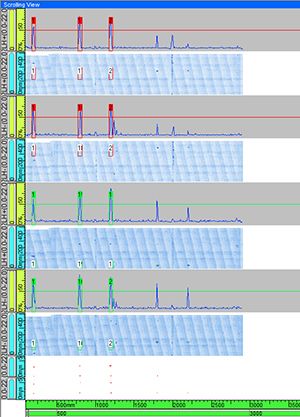
Oblique notch detection for intermediate angles (scrolling views and 2D mapping data, alarms)

Conclusion/Key Benefits

Because the gapless solution offered by the Olympus RTIS is just as simple to perform as the current calibration method, even medium-skilled operators can do it. It is systematized, automated, and repeatable.

Olympus’ proven QuickScan LT hardware already has the capability to perform gapless inspection, so existing systems can be easily upgraded to this new technology. Users can also choose whether or not to activate the gapless function, according to the strictness and precision level required for a particular pipe batch.
Olympus IMS

이 애플리케이션에 사용되는 제품
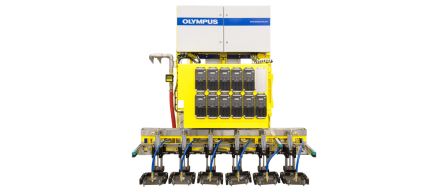
RTIS는 위상 배열 기술을 사용하여 튜브 전체를 검사합니다. 이 시스템은 신속한 결합과 짧은 비검사 거리를 제공하는 영구적이고 안정적인 물 챔버를 유지하기 위해 막을 사용하는 '물 쐐기(Water Wedge)' 개념에 기초합니다.
죄송합니다. 이 페이지는 해당 국가에서 사용할 수 없습니다.
아래 양식을 작성하여 원하는 내용을 알려주십시오.
죄송합니다. 이 페이지는 해당 국가에서 사용할 수 없습니다.