Identifying particle images that need to be deleted, merged, or split and creating reports
In the final installment of this six-part blog series, we examine the actions you can take while reviewing the results and the different types of data reports you can create. Here is where results review and reporting fit into the overall technical cleanliness inspection process:
- Preparation
- Extraction
- Filtration
- Drying and Weighing
- Inspection
- Image Acquisition
- Particle Detection
- Particle Size Measurement and Classification
- Particle Count Extrapolation and Normalization
- Contamination Level Calculation
- Cleanliness Code Definition
- Maximum Approval Check
- Separation of Reflective and Nonreflective Particles
- Fiber Identification
- Results Review
- Reporting
Reviewing Results
You can inspect the detected and classified particles prior to creating your report. This gives you a chance to double-check and confirm the cleanliness results interactively before presenting them. Typically, the largest particles will be rechecked. The following operations are possible during this review:
Deleting Incorrectly Identified Particles
Errors on the filter membrane—for instance, artifacts caused by incorrect drying—can be mistakenly detected as particles. These incorrectly identified particles should be deleted (the highlighting that is identifying them as particles should be removed) (Fig. 1).
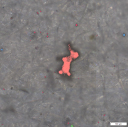
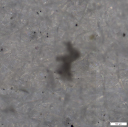
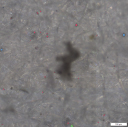
Figure 1: Artifact incorrectly highlighted as a particle (left). The same image with all highlighting removed (middle). The same image with highlighting removed on the artifact (right).
Splitting Particles
When particles are very close together, they are often not individually detected and are incorrectly identified as one large particle. In these instances, they should be reclassified as separate particles (Fig. 2).
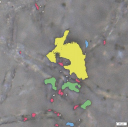

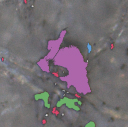
Figure 2: Multiple particles incorrectly highlighted as one large particle (left). The same image with all highlighting removed (middle). The same image with multiple particles now correctly identified as separate particles (right).
Merging Particle Fragments
In other instances, a single particle is incorrectly identified as multiple particles. If this is the case, particle fragments should be merged if they obviously belong together (Fig. 3).
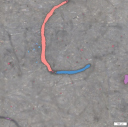
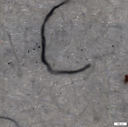
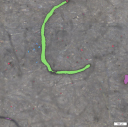
Figure 3: Two particle fragments incorrectly highlighted as separate particles (left). The same image with all highlighting removed (middle). The same image with the particle now correctly highlighted as a single particle (right).
Changing the Particle Family
If you discover that a particle has been classified in the wrong family (i.e., a reflective particle is incorrectly listed as non-reflective), you should adjust the particle’s classification.
Report Creation
A technical cleanliness inspection report contains all the measurement results and data for a filter membrane in a standardized form (Fig. 4). Depending on the cleanliness standard used, it is mandatory to show specific results or measurement characteristics (i.e., camera exposure time, scanned/examined sample area, etc.). Some standards require the description of certain acquisition parameters, such as the name of the standard and the particle area coverage. The report’s appearance can be adapted to the needs of the measurements and the specifications of the company requesting the data. Classification tables and images of the largest particles can be shown. This information can all be defined in the report templates available within your inspection software. |  Figure 4: Sample inspection reports made using the OLYMPUS CIX100 technical cleanliness inspection system. |
A central component of most industrial manufacturing processes, technical cleanliness inspection includes several preparation and inspection steps, each of which we examined within this blog series. We hope that this series has made the technical cleanliness inspection process easier to understand and has given you an idea of how you can optimize your workflow and ensure consistently reliable inspection results.
Related Content
Breaking Down the Technical Cleanliness Workflow Part 1
Breaking Down the Technical Cleanliness Workflow Part 2
Breaking Down the Technical Cleanliness Workflow Part 3
Breaking Down the Technical Cleanliness Workflow Part 4
Breaking Down the Technical Cleanliness Workflow Part 5
Get In Touch