Olympus Logo

Contact Us Contact Us

  • Products▾
    • Thickness and Flaw Inspection Solutions▾
      • Flaw Detectors / Phased Array Flaw Detectors▾
        • Ultrasonic Flaw Detectors
        • Phased Array
        • Eddy Current Products
        • Eddy Current Array Products
        • Bond Testing
      • Thickness Gauges▾
        • 27MG
        • 45MG
        • 38DL PLUS
        • Magna-Mike 8600
        • 35RDC
        • Transducers and Accessories
      • Transducers and Probes▾
        • Single and Dual Element Transducers
        • Eddy Current Probes
        • Probes for Tube Inspection
        • Phased Array Probes
        • BondMaster Probes
      • Automated Inspection Systems▾
        • Wheel Inspection System
        • Bar Inspection Systems
        • Tube Inspection Systems
        • Friction Stir Weld Inspection System
      • NDT Systems Instrumentation ▾
        • FOCUS PX / PC / SDK
        • QuickScan
      • NDT Industrial Scanners▾
        • Weld Inspection Scanners
        • Corrosion Inspection Scanners
        • Aerospace/Wind Blade Inspection Scanners
        • Scanner Accessories
      • The Olympus Scientific Cloud
    • XRF and XRD Analyzers▾
      • Handheld XRF Analyzers▾
        • Vanta
        • Vanta Element
        • DELTA Professional
      • Compact and Portable XRF Analyzers▾
        • Vanta
        • Vanta Element
        • GoldXpert
        • Xpert for Consumer/RoHS
      • Process XRF Analyzers▾
        • FOX-IQ
      • XRD Analyzers▾
        • TERRA II Portable XRD Analyzer
        • BTX III Benchtop XRD Analyzer
      • OEM Solutions▾
        • X-STREAM
      • Applications and Solutions Key
      • The Olympus Scientific Cloud
    • Industrial Microscopes▾
      • Scanning Probe Microscopy▾
        • OLS4500
      • Laser Confocal Microscopes▾
        • OLS5100
      • Digital Microscopes
      • Measuring Microscopes▾
        • STM7
        • STM7-BSW
      • Cleanliness Inspector▾
        • OLYMPUS CIX100
      • Light Microscopes▾
        • Upright Microscopes
        • Inverted Microscopes
        • Modular Microscopes
      • Semiconductor & Flat Panel Display Inspection Microscopes▾
        • MX63 / MX63L
        • AL120
        • AL120-12
      • Stereo Microscopes▾
        • SZX16
        • SZX10
        • SZX7
        • SZ61/SZ51
      • Digital Cameras▾
        • DP74
        • SC180
        • UC90
        • DP27
        • SC50
        • LC30
        • DP22
        • XM10
        • XM10IR
      • Image Analysis Software▾
        • OLYMPUS Stream
      • Micro Spectrophotometer▾
        • USPM-RU-W
        • USPM-RU III
      • Objective Lenses▾
        • MPLAPON
        • MPLAPON-Oil
        • MPLN
        • MPLN-BD
        • MPLFLN
        • MPLFLN-BD
        • MPLFLN-BDP
        • LMPLFLN
        • LMPLFLN-BD
        • SLMPLN
        • LCPLFLN-LCD
        • LMPLN-IR/LCPLN-IR
        • White Light Interferometry Objective
        • Micrometer
      • OEM Microscope Components for Integration▾
        • Equipment Integration Solutions
        • Objective Lenses
        • Optical Microscope Frames
        • Super Wide Tube Lens
        • Optical Microscope Modules
        • Modular Microscope Assemblies
      • Microscope FAQ
    • Videoscopes and Borescopes▾
      • Videoscopes▾
        • IPLEX NX
        • IPLEX GAir
        • IPLEX GX/GT
        • IPLEX G Lite
        • IPLEX TX
        • IPLEX Long Scope Solution
      • Fiberscopes▾
        • Small Diameter Fiberscopes
      • Rigid Borescopes▾
        • Standard Rigid Borescopes
        • Swing Prism Borescopes
        • Zoom Swing Prism Borescopes
        • MK Modular Mini-Scope
        • Aeroengine Borescopes
      • Light Sources
      • Inspection Assist Software▾
        • InHelp
  • Industries
  • Blog
  • Resources
  • Support▾
    • Contact Us
    • Olympus Scientific Cloud
    • Training Academy
    • Customer Service
    • Service Centers
    • Software Downloads
    • Product Information
    • Discontinued and Obsolete Products
    • Product Service Termination List
    • ISO Certifications
    • MSDS Datasheets
    • Terms and Conditions of Supply
    • CIC
    • Olympus Technolab
    • Microscope Classroom
    • Compliance and Ethics at Olympus
    • Same Day Shipping Program
    • Custom Financing Solutions
  • Rentals
  • Shop
  • Search
  • My Account
    • IMS Log in
    • IMS Registration
    • My Apps
    • My Devices
    • My Data
    • OSC Marketplace
    • My Organization
    • OSC Log in
    • OSC Log in
    • Log Out
    • Log Out
Industrial Solutions
Thickness Gage Tutorial

Introduction to Thickness Gages

Home/ Thickness Gage Tutorial/ 1.0 Introduction to Ultrasonic Thickness Gaging/ Introduction to Thickness Gages

For more than fifty years, ultrasonic thickness gages have been used by quality control professionals to measure the thickness of a wide variety of products in manufacturing, by inspectors testing critical parts like aircraft turbine blades for wear, and by maintenance crews to check pipes and tanks for in-service corrosion. In recent years, as hardware and software development has advanced, ultrasonic gaging has steadily become a more powerful, reliable, and user-friendly tool. This tutorial describes how they work and how they can be used.

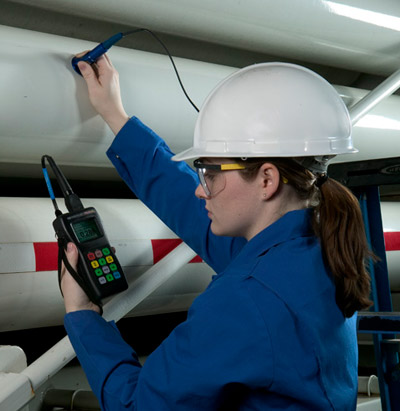
Ultrasonic thickness gages are frequently employed in situations where an inspector has access to only one side of a part whose thickness must be determined, such as the case of a pipe or tube, or where simple mechanical measurement is impossible or impractical for other reasons such as part size or access limitations. The fact that thickness measurements can quickly and easily be made from one side, with no need to cut parts, is one of the major advantages of this technology.

Virtually any common engineering material can be measured ultrasonically. Ultrasonic thickness gages can be set up for metals, plastics, composites, fiberglass, ceramics, and glass. On-line or in-process measurement of extruded plastics and rolled metal is often possible, as is measurement of individual layers or coatings in multilayer fabrications. Liquid levels and biological samples can also be measured. Ultrasonic gaging is always completely nondestructive, with no cutting or sectioning required. The range of measurement can be as large as 0.08 mm (0.003") to 635 mm (25") depending on material and transducer selection. (Materials that are generally not suitable for measurement with conventional ultrasonic gages include wood, concrete, paper, and foam products.)

All ultrasonic thickness gages work by very precisely measuring how long it takes for a sound pulse that has been generated by a probe called an ultrasonic transducer to travel through a test piece. Because sound waves reflect from material boundaries, timing the echo from the far side of the test piece can be used to gage its thickness, in the same way that radar or sonar measure distance. Resolution can be as fine as 0.001 mm or 0.0001".

Most applications use small, handheld transducers, but some complex geometries as well as on-line testing require noncontact transducers that focus a sound beam through a water column or bath. Measurements are essentially instantaneous and can be recorded on internal instrument data loggers for documentation or analysis.

Continue to Benefits of Ultrasonic Gaging  Thickness Gage Tutorial Next Chapter
Sorry, this page is not available in your country
Let us know what you're looking for by filling out the form below.
  • Contact Us
  • 1.0 Introduction to Ultrasonic Thickness Gaging
    • Introduction to Thickness Gages
    • Benefits of Ultrasonic Thickness Gaging
    • History of Ultrasonic Thickness Gaging
    • Types of Equipment
    • Theory of Operation
  • 2.0 Ultrasonic Transducers for Thickness Gaging
  • 3.0 Modes of Measurements
  • 4.0 Calibrating an Ultrasonic Thickness Gage
  • 5.0 Gage Setup Considerations
  • 6.0 Factors Affecting Measurement
  • 7.0 Special Conditions
  • 8.0 Typical Ultrasonic Gaging Applications
  • 9.0 Appendices
  • Subscribe to Newsletters
Home/ Thickness Gage Tutorial/ 1.0 Introduction to Ultrasonic Thickness Gaging/ Introduction to Thickness Gages
Print

Copyright OLYMPUS CORPORATION, All rights reserved.

Global | Terms Of Use | Privacy Notice | Cookies | About Us | Careers | Careers | Sitemap

Copyright OLYMPUS CORPORATION, All rights reserved.

Global | Terms Of Use | Privacy Notice | Cookies | About Us | Imprint | Careers | Careers | Sitemap

  • Youtube
  • LinkedIn
  • Twitter
  • Facebook

This site uses cookies to enhance performance, analyze traffic, and for ads measurement purposes. If you do not change your web settings, cookies will continue to be used on this website. To learn more about how we use cookies on this website, and how you can restrict our use of cookies, please review our Cookie Policy.

OK
Cancel